 Call 0800 955 8810


Last Updated on May 14, 2026
Bathroom “Tetris”: How to Fit a Safe Shower in a “Box Room”
The average UK bathroom is just 1.7m x 2.0m (often even smaller in terraced houses or flats).
If you are struggling with mobility, this lack of space isn’t just annoying—it’s dangerous. Maneuvering a walking frame or wheelchair in a cramped room is difficult, and banging your elbows on the basin is a daily frustration.
Many people think their only option is a clinical “wet room.” While Small Wet Rooms are fantastic, they aren’t the only solution.
A cleverly designed Shower Tray Layout can often save just as much space, cost less, and keep your bathroom dry.
At EA Mobility, we specialise in small spaces. Here is the ultimate detailed guide to 25 Layouts, Hacks, and Ideas.
🏆 At A Glance: Top 5 Layouts for Small Spaces
| Layout Name | Best For… | Space Saving Score |
| The Corner Entry | Square rooms (1.8m x 1.8m) | ⭐⭐⭐ |
| The Alcove Swap | Direct bath replacement | ⭐⭐⭐⭐⭐ |
| The Bi-Fold Miracle | Assisted bathing (Carers) | ⭐⭐⭐⭐ |
| The Quadrant | Tiny En-suites/Cloakrooms | ⭐⭐⭐ |
| The Walk-Through | Narrow “Galley” rooms | ⭐⭐⭐⭐ |
Part 1: The 5 Essential Layouts (The Foundation)
1. The “Corner Entry” (The Space Saver)
If you have a square room, the corners are your best friend.
- The Layout: We install a 900mm x 900mm square tray tucked into the corner of the room.
- The Trick: Use Sliding Doors or Bi-Fold Doors that fold inward, rather than a pivot door.
- Why It Works: It avoids a door swinging out into the room (hitting the basin), keeping the center clear for a wheelchair turning circle.
- 💡 Quick Specs:
- Best For: Square bathrooms (approx 1.8m x 1.8m).
- Not Ideal For: Very narrow “galley” rooms where width is restricted.

2. The “Alcove” Swap (Bath Replacement)
Most UK bathrooms have a bath positioned between three walls (an alcove).
- The Layout: We remove the standard 1700mm bath and replace it directly with a 1700mm x 700mm Shower Tray.
- The Trick: Install a sliding door across the full width of the front.
- Why It Works: You get a huge double-sized shower without changing the footprint of the room. Crucially, no waste pipes or soil pipes need to be moved, saving £££s.
- 💡 Quick Specs:
- Best For: Replacing a bath directly with minimal mess.
- Not Ideal For: Wheelchair users who need a very wide turning circle (narrow entry).

3. The “Bi-Fold” Miracle (For Carers)
If you need assisted bathing, standard glass doors get in the way.
- The Layout: We install a tray with Half-Height Bi-Fold Doors.
- The Trick: When the shower is not in use, the doors fold back completely against the wall.
- Why It Works: The shower tray effectively becomes part of the floor again, giving you massive turning space for a wheelchair when the shower isn’t running.
- 💡 Quick Specs:
- Best For: Assisted bathing / Carer access.
- Not Ideal For: High-pressure power showers (water can splash over the top).
4. The “Quadrant” (Curved) Tray
This is the classic solution for tight ensuites.
- The Layout: A curved tray that sits in the corner (shaped like a pizza slice).
- The Trick: It shaves off the sharp corner of a standard square tray.
- Why It Works: By removing the hard right angle, you gain precious inches of floor space. This often stops you banging your shin or walking frame on the corner of the shower.
- 💡 Quick Specs:
- Best For: Very tight en-suites or cloakroom conversions.
- Not Ideal For: Sitting down (the curved shape reduces internal legroom).
5. The “Walk-Through” (Galley Style)
For long, narrow rooms, sometimes less is more.
- The Layout: Place a tray at the far end of the room with a single fixed glass screen separating it from the toilet.
- The Trick: Leave the entry completely open (no door).
- Why It Works: It creates a “wet zone” at the back of the room while keeping the toilet and basin dry at the front. It looks incredibly modern.
- 💡 Quick Specs:
- Best For: Long, narrow Victorian-style bathrooms.
- Not Ideal For: Very cold rooms (open showers can be drafty).

Part 2: Space-Saving Fixtures (The Hardware)
6. Wall-Hung Toilets
A standard toilet cistern takes up 200mm of depth.
- The Hack: Hide the cistern (water tank) inside the wall or a slimline cabinet, and lift the ceramic pan off the floor.
- The Trick: Mount the toilet on a steel frame hidden behind the tiles.
- Why It Works: Seeing the continuous floor underneath the toilet tricks the eye into thinking the room is bigger. Plus, it makes mopping underneath effortless.
- 💡 Quick Specs:
- Best For: Creating an illusion of space and better hygiene.
- Not Ideal For: Stud walls without reinforcement (requires strong fixing frame).
7. Floating Basins (Wheelchair Access)
Standard pedestals block your feet.
- The Hack: Remove the ceramic pedestal and mount the basin directly onto the wall using strong chrome bottle traps.
- The Trick: Ensure the waste pipe goes into the wall, not the floor.
- Why It Works: This provides essential knee space for a wheelchair user to get close to the tap without hitting their legs against a pedestal.
- 💡 Quick Specs:
- Best For: Wheelchair users and seated grooming.
- Not Ideal For: Heavy storage needs (you lose the cupboard space).
8. Corner Basins
Corners are often dead space in a rectangular room.
- The Hack: A small, curved basin mounted in the “dead space” of a corner.
- The Trick: Use a monobloc mixer tap to save space on the basin rim.
- Why It Works: It frees up the main flat wall for other essentials, like a towel radiator or a safety grab rail, preventing the room from feeling cluttered.
- 💡 Quick Specs:
- Best For: Cloakrooms or very tiny en-suites.
- Not Ideal For: Face washing (corner basins are often very small).
9. Short-Projection Toilets
Not all toilets are the same size.
- The Hack: Ask specifically for a “Short Projection” or “Compact” toilet.
- The Trick: These project only 600mm from the wall (compared to the 700mm+ standard).
- Why It Works: Saving 10cm sounds small, but in a tiny UK bathroom, it can be the difference between the bathroom door opening fully or banging into the toilet bowl.
- 💡 Quick Specs:
- Best For: Narrow rooms where the door swings close to the toilet.
- Not Ideal For: Very tall users (seat area is slightly smaller).
10. Slimline Shower Trays
Old-fashioned trays require a large step up.
- The Hack: Don’t use a high tray on legs. Use a 35mm ultra-low profile tray.
- The Trick: If the floor is timber, we can often sink it slightly to lower it further.
- Why It Works: Less visual bulk makes the floor look continuous. More importantly, the lower step reduces the trip hazard significantly compared to a deep tray.
- 💡 Quick Specs:
- Best For: Modern aesthetics and “Ambulant” (walking) disabled users.
- Not Ideal For: Concrete floors where gravity drainage is impossible (may need a pump).
Part 3: Heating & Storage Hacks
11. Ditch the Radiator (Go Underfloor)
Radiators steal valuable wall space.
- The Hack: Install electric Underfloor Heating mesh beneath the tiles or vinyl.
- The Trick: Use a programmable thermostat to heat the floor only when needed.
- Why It Works: It frees up the walls for grab rails or shower seats. Crucially, it dries the floor instantly after a shower, reducing slip risks.
- 💡 Quick Specs:
- Best For: Maximising wall space and luxury comfort.
- Not Ideal For: Extremely cold houses (may need a backup towel rail).
12. Recessed Niches (No Wire Racks)
Wire baskets rust and scratch you if you fall.
- The Hack: We build tiled shelves inside the wall cavity (between the timber studs).
- The Trick: Add a slight slope to the shelf so water runs off.
- Why It Works: Recessed niches provide storage that takes up zero room space and has no sharp edges to catch on.
- 💡 Quick Specs:
- Best For: Storing shampoo safely in tight showers.
- Not Ideal For: Solid brick walls (requires chasing out bricks, which is messy).
13. Vertical Towel Rails
If you need a radiator, go high and thin.
- The Hack: Replace a wide horizontal radiator with a tall, narrow heated towel rail (often just 300mm wide).
- The Trick: Install it high up on the wall behind the door or at the end of the bath footprint.
- Why It Works: It provides essential heating without stealing “leaning space” along the main walls where you might need to install a safety handrail.
- 💡 Quick Specs:
- Best For: Tight gaps and keeping towels warm.
- Not Ideal For: Heating a very large room alone.
14. Mirror Cabinets (Dual Purpose)
Don’t waste space with separate mirrors and cupboards.
- The Hack: Recess a mirror cabinet into the wall above the sink so it sits flush with the tiles.
- The Trick: Choose a cabinet with an integrated shaver socket and LED light to save installing separate wall lights.
- Why It Works: You get storage, lighting, and a mirror without a bulky box protruding into the room at head-height.
- 💡 Quick Specs:
- Best For: Storing medicines safely out of reach.
- Not Ideal For: Load-bearing walls (difficult to recess).
15. Sliding Pocket Doors
The ultimate space reclaimer.
- The Hack: Replace your main bathroom door with a sliding pocket door.
- The Trick: Use a “Pocket Door Kit” which builds a metal cage inside the wall for the door to slide into.
- Why It Works: A standard door swings inwards, killing 1 square metre of floor space. A pocket door reclaims that space, allowing a wheelchair user to turn around.
- 💡 Quick Specs:
- Best For: Small ensuites and downstairs toilets.
- Not Ideal For: Walls full of plumbing pipes (cavity must be empty).
Part 4: Visual & Safety Style Ideas
16. “Invisible” Glass
Make the room feel huge.
- The Style: Frameless glass screens (no metal edges).
- The Trick: Use 8mm or 10mm toughened glass for strength.
- Why It Works: Thick frames break up your eye line, shrinking the room visually. Clear frameless glass disappears, making the room look 30% bigger.
- 💡 Quick Specs:
- Best For: Creating a “Hotel Luxury” vibe.
- Not Ideal For: Very uneven walls (frames hide wonky tiles).
17. The “Scandi” Look (Light Colors)
Small rooms need light.
- The Style: White gloss tiles, light wood-effect safety flooring, and bright daylight LED lighting.
- The Trick: Use large format tiles to minimise grout lines.
- Why It Works: Light colors reflect light; dark colors absorb it. In a small, windowless bathroom, high-gloss white surfaces make the space feel airy and hygienic.
- 💡 Quick Specs:
- Best For: Internal bathrooms with no windows.
- Not Ideal For: People who prefer a cozy, moody aesthetic.
18. Continuous Flooring
Trick the eye.
- The Style: Match your floor tiles (or vinyl) to the colour of your shower tray.
- The Trick: Use a “slate effect” tray and matching slate effect vinyl.
- Why It Works: If the floor looks continuous from the door to the drain, the brain perceives the total floor area as larger.
- 💡 Quick Specs:
- Best For: Making a tiny room feel wider.
- Not Ideal For: White trays (unless you have a white floor).
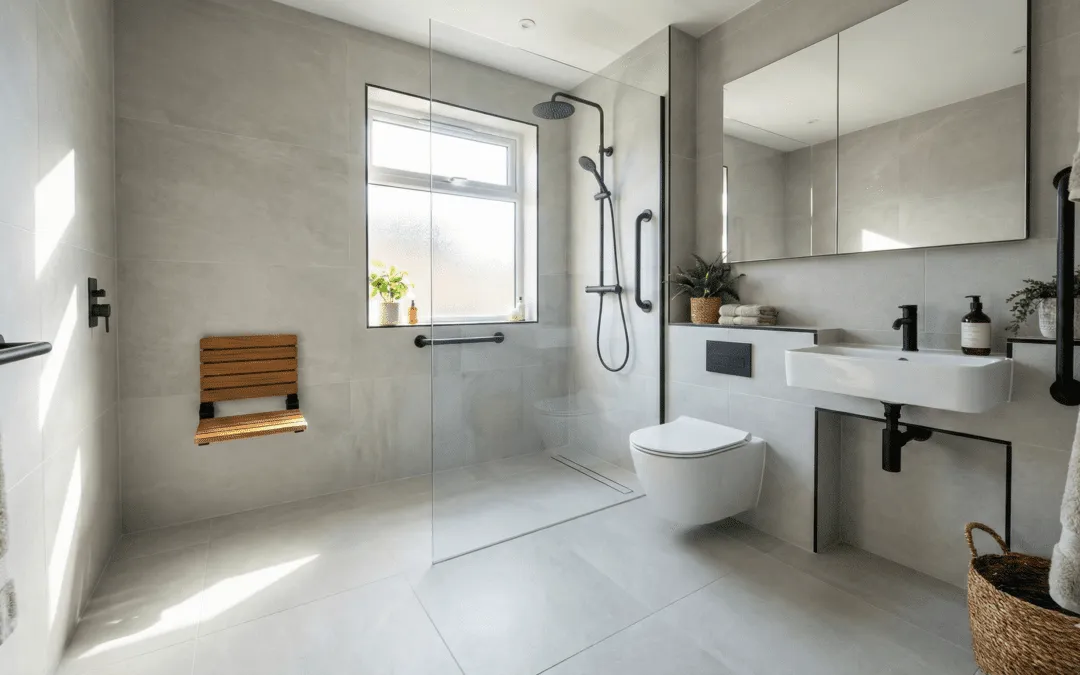
19. The Fold-Down Seat (Wood Effect)
Safety that looks stylish.
- The Style: A bamboo or teak fold-down seat with chrome brackets.
- The Trick: Mount it at the correct height for your knees (measured by our surveyor).
- Why It Works: It looks like a high-end spa feature, not a medical aid. Crucially, it folds flat against the wall (saving 400mm depth) when you need to stand.
- 💡 Quick Specs:
- Best For: Multi-user bathrooms.
- Not Ideal For: Bariatric users (requires a seat with legs).
20. Contrast Rails (Industrial Chic)
Safety for the visually impaired.
- The Style: Matte black grab rails on white subway tiles.
- The Trick: Match the rails to your taps and shower head for a cohesive look.
- Why It Works: This looks incredibly modern (“Industrial Chic”), but serves a vital safety purpose: High contrast makes the rails easy to see for those with poor eyesight.
- 💡 Quick Specs:
- Best For: Users with visual impairments or dementia.
- Not Ideal For: Dark tiled walls (black rails would disappear).
Part 5: The “Pro-Level” Upgrades (What Competitors Miss)
21. High-Power Extraction (The Mould Killer)
Damp is the enemy of small bathrooms.
- The Hack: Install an Inline Extraction Fan in the loft space above the bathroom.
- The Trick: Wire it to the light switch with a timer overrun.
- Why It Works: In a small room, steam builds up instantly, making floors slippery. An inline fan clears the steam in seconds, preventing slips.
- 💡 Quick Specs:
- Best For: Windowless bathrooms.
- Not Ideal For: Ground floor flats with no ceiling access.
22. Dual-Purpose Grab Rails
Reduce wall clutter.
- The Hack: Use “2-in-1” rails.
- The Trick: A grab rail that doubles as a soap dish holder, a towel rail, or a toilet roll holder.
- Why It Works: It reduces “Visual Clutter.” Instead of having two items on the wall, you just have one stylish item that does both jobs firmly.
- 💡 Quick Specs:
- Best For: Tiny spaces where wall space is premium.
- Not Ideal For: Very heavy loads (dedicated rails are stronger).
23. Visual Zoning (For Dementia)
Safety through colour.
- The Hack: Use a different colour tile specifically inside the shower tray area.
- The Trick: Contrast the floor colour with the wall colour.
- Why It Works: This clearly marks the “Wet Zone” for users with cognitive impairments, preventing them from accidentally stepping into the shower area.
- 💡 Quick Specs:
- Best For: Dementia-friendly design.
- Not Ideal For: Minimalists.
24. Smart Digital Showers
Control from outside.
- The Hack: A remote control shower unit (like the Aqualisa Quartz).
- The Trick: Mount the processor box in the loft or under the bath.
- Why It Works: You can put the control panel outside the shower enclosure. You can turn the water on and get it to temperature before you even step in.
- 💡 Quick Specs:
- Best For: Preventing “cold water shock” and scalds.
- Not Ideal For: Tight budgets (expensive).
25. The “Threshold Strip”
The final defense.
- The Hack: A discreet rubber or metal strip installed at the bathroom door.
- The Trick: Use a “collapse-down” rubber dam that a wheelchair can roll over.
- Why It Works: In a tiny bathroom, water splashes everywhere. This acts as a fail-safe barrier, ensuring no water ever escapes under the door to ruin carpets.
- 💡 Quick Specs:
- Best For: Upstairs bathrooms with carpets outside.
- Not Ideal For: Strictly level-access wet rooms.
★ The Estate Agent’s Secret (Resale Value)
Customers often ask: “Will replacing the bath with a shower devalue my home?”
In a small bathroom, the answer is usually NO.
A cramped, dangerous bath that takes up the whole room is a negative. A spacious, luxury walk-in shower is a positive.
- Rule of Thumb: If you have a second bathroom, keep one bath. If this is your only bathroom, a high-quality accessible shower is far more desirable than a bath you can’t use.
Bonus: The “Minimum Dimensions” Cheat Sheet
Don’t guess if it will fit. Use these UK standard minimums:
| Item | Minimum Clearance Needed |
| Doorway | 800mm (for wheelchair access) |
| Toilet Width | 700mm (gap between walls/units) |
| Shower Entry | 500mm (to squeeze in) / 850mm (for wheelchair) |
| Transfer Space | 750mm (space next to toilet for transfer) |
FAQs
Q: What is the smallest bathroom size that can fit a walk-in shower?
A: The absolute minimum footprint for a functional walk-in shower is 76 cm × 76 cm (roughly 2.5 ft square), but most installers recommend 90 cm × 90 cm as a realistic working minimum. For the wider room itself, a bathroom measuring around 1.2 m × 1.7 m can accommodate a corner shower enclosure alongside a toilet and small basin — provided the layout is planned carefully and a sliding or bi-fold door is used instead of a hinged one.
Q: Which shower layout works best in a 5×7 bathroom?
A: A 5 ft × 7 ft (roughly 1.5 m × 2.1 m) bathroom is one of the most common small bathroom sizes in UK and US homes. The most efficient layout places the shower in one of the short-wall corners — typically a 90 cm × 90 cm quadrant or square enclosure. This leaves the remaining floor space for the toilet and basin side by side along the opposite or adjacent wall. A 5×7 is also large enough to fit a 36-inch × 36-inch (91 cm) walk-in shower with a fixed glass panel instead of a door, which removes the swing clearance problem entirely.
Q: How do you fit a walk-in shower next to a toilet without the bathroom feeling cramped?
A: The key is treating the glass shower screen as a visual boundary, not a solid wall. A frameless or semi-frameless panel maintains sightlines, making the room feel larger than it is. Positioning the shower head on the wall shared with the toilet (rather than the opposite wall) means the wet spray stays away from the toilet area. Leave at least 60 cm of clear floor space between the toilet pan and the shower edge — the UK building regulation minimum is 600 mm front clearance — and both fixtures remain independently usable.
Q: Can a walk-in shower fit alongside a bath in a small bathroom?
A: Yes — and this combination is more common than people expect, particularly in en-suite or first-floor bathrooms where the homeowner wants both. The practical approach is to run a narrow walk-in shower (typically 70–80 cm wide) along the same wall as the bath, end to end. A fixed glass panel separates them. The bath handles deep soaking; the shower handles the daily routine. In rooms shorter than 2.4 m, a P-shaped or L-shaped bath with an integrated shower screen can achieve the same result in a tighter footprint.
Q: What does a 2×2 metre bathroom layout with a walk-in shower look like in practice?
A: A 2 m × 2 m square bathroom gives you roughly 4 square metres to work with — enough for a toilet, basin, and a walk-in shower if the space is planned in a single wet zone. The most common configuration places an 80 cm × 80 cm corner shower diagonally opposite the door, with the toilet and basin on the adjacent walls. Alternatively, a 1 m × 80 cm rectangular tray along the back wall keeps the floor plan symmetrical and frees up more circulation space in the centre of the room.
Q: How does a 6×10 bathroom layout differ from smaller formats when adding a walk-in shower?
A: A 6 ft × 10 ft (1.8 m × 3 m) bathroom is generously sized for a small bathroom category and opens up layout options not available in tighter rooms. The extra length along the 10 ft wall allows a full-width walk-in shower at one end — typically 1.2 m deep across the full 1.8 m width — with the toilet and basin arranged at the other end. This end-to-end separation of wet and dry zones is cleaner, easier to ventilate, and looks more considered than a corner layout forced into a smaller footprint.
Q: What makes an open shower design suitable for a small bathroom?
A: Open or doorless showers work particularly well in small bathrooms because they eliminate the largest single obstacle to usable floor space: the door swing. A fixed glass panel or a half-wall of tiling defines the shower zone without enclosing it, so the room reads as one continuous space. The trade-off is containment — water spray can reach farther without a door. This is managed with a ceiling-mounted rainfall head (which falls vertically rather than spraying outward) or by positioning the showerhead on the back wall, directing water away from the open entry.
Q: What are the best small bathroom remodel ideas that include a walk-in shower?
A: The highest-impact changes in a small bathroom remodel are rarely about adding more — they are about removing what blocks space. Replacing an old over-bath shower with a dedicated level-access walk-in enclosure reclaims the full floor area currently occupied by the bath. Swapping a hinged door for a pocket door or barn-style sliding door can free up 60–70 cm of swing clearance. Wall-hung basins and back-to-wall toilets eliminate pedestal and cistern bulk. Combined with large-format tiles laid in a continuous run from floor to shower, the visual effect is of a significantly bigger room.
Q: How is a small master bathroom with a walk-in shower different from a standard small bathroom layout?
A: The primary difference is expectation. A master en-suite is a private, daily-use bathroom — so comfort and sensory quality matter more than in a family bathroom. This typically means prioritising a slightly larger shower enclosure (at least 90 cm × 120 cm rather than the minimum 76 cm square), a thermostatic valve rather than a simple mixer, and better lighting. Even in a master bathroom measuring only 1.8 m × 2.1 m, these details shift the feel from functional to considered. The layout logic remains the same; the specification simply steps up.
Q: What should a handicap or accessible shower look like in a small bathroom?
A: An accessible shower in a small bathroom needs three things above all else: a level access entry with no lip or threshold to step over, a fold-down or fixed integrated seat within reach of the controls, and grab rails positioned at both the entry point and along the shower wall. The shower enclosure should be at least 90 cm × 90 cm, though 1 m × 1 m is the recommended minimum for comfortable seated use. Controls should be positioned at approximately 85–100 cm from the floor so they are reachable before the water is turned on — avoiding the cold-water lunge is a basic comfort and safety principle that is often overlooked.
Q: What are the real dimensions of a small bathroom shower area — and how much clearance do you actually need?
A: The shower tray or wet zone itself can start at 76 cm × 76 cm, but the usable comfort starts at 90 cm × 90 cm. Beyond the tray, you need a minimum 600 mm clear floor space in front of the shower entry for safe access — this is a Part M building regulation requirement in the UK for accessible installations. If a shower seat or fold-down bench is included, the clear space in front of the seat should be at least 750 mm. Factor these clearances into any floor plan sketch before ordering a tray or enclosure.
Q: How do pictures and images of small bathrooms with walk-in showers help when planning a layout?
A: Real photographs serve a different planning purpose than floor plans. A floor plan tells you what fits — a photograph tells you what it will feel like to stand in the room. When reviewing images of small walk-in shower bathrooms, look specifically at: the tile choice (large-format continuous tiles remove grout-line visual clutter), the glass panel type (frameless reads larger than framed), and the lighting position (a ceiling fitting centred over the shower zone rather than the middle of the room changes the entire perceived size). Our before-and-after gallery on this page shows these variables in real EA Mobility installations.
Q: What does a walk-in shower look like on a tight budget — and what should you not cut corners on?
A: Budget walk-in showers typically save money on the enclosure (a simple frameless panel costs less than a fully enclosed cubicle) and on the tray (a standard acrylic tray is far cheaper than a stone resin or tiled wet room floor). Where cutting costs causes regret: the shower valve, the waterproofing membrane, and the installation labour. A thermostatic valve that holds temperature costs more upfront but prevents scalding — essential for elderly users. A failed tanking membrane means water damage inside the wall structure, which costs far more to fix than it cost to avoid. Budget on the surround; invest in the core.
Q: What is the best shower design for an extremely narrow or galley-style bathroom?
A: In a long, narrow bathroom — anything where the width is under 1.4 m — the worst mistake is placing the shower at the end of the room and forcing a walk past the toilet to reach it. The better solution is to position the shower first as you enter, with a fixed glass panel rather than a door that would block the corridor. A rectangular shower tray measuring 120 cm × 70 cm placed across the width of a 1.4 m room leaves the full 70 cm corridor unobstructed. Wet-room style tiling from floor to ceiling on all three shower walls visually widens the space further.
Q: How does a small bathroom with both a shower and full toilet suite get planned without feeling overcrowded?
A: The single biggest layout error in small full bathrooms is treating each fixture as a separate island. The solution is zoning: group the toilet and basin together as the ‘dry zone’ and let the shower occupy one dedicated corner or wall as the ‘wet zone’. Wall-hung fixtures with concealed cisterns reduce visual bulk significantly. If the toilet must sit between the basin and shower, a back-to-wall pan keeps the profile slim. The floor should remain as uncluttered as possible — furniture-style vanity units that sit on the floor cut off sight lines and make even a 1.7 m × 2 m bathroom feel boxed in.
Q: What is the difference between a small shower design and a proper walk-in shower — and which is right for a compact bathroom?
A: A shower enclosure (or shower cubicle) is a self-contained unit with walls on all sides and a door — it defines its own space within the bathroom. A walk-in shower has at minimum one open or partially open side, relying on the room itself as one of its walls. In a compact bathroom, a walk-in is usually the better choice: it removes the door, creates a sense of visual openness, and is significantly easier to clean. The practical minimum for a walk-in that does not constantly spray water across the bathroom is around 90 cm × 80 cm with the head mounted on the back wall, directing water away from the opening.
Let us Design Your Space
You don’t need a mansion to have a safe bathroom. You just need a tape measure and some imagination.
 Book a Free Home Assessment
Our surveyors are experts in “Tetris.” We will figure out exactly which layout gives you the most safety in the space you have.

Simon
Clients’ Needs Assessor
Simon brings extensive experience from the healthcare sector, having spent over 25 years working alongside physiotherapists and occupational therapists.

